
The visual quick reference collection
See it.
Know what to check.
Real photos. Clear labels. A closer look at chicken anatomy, unusual eggs, feathers, parasites, predator clues and growing chicks.
26 photo references · 6 topics · No sign-in needed
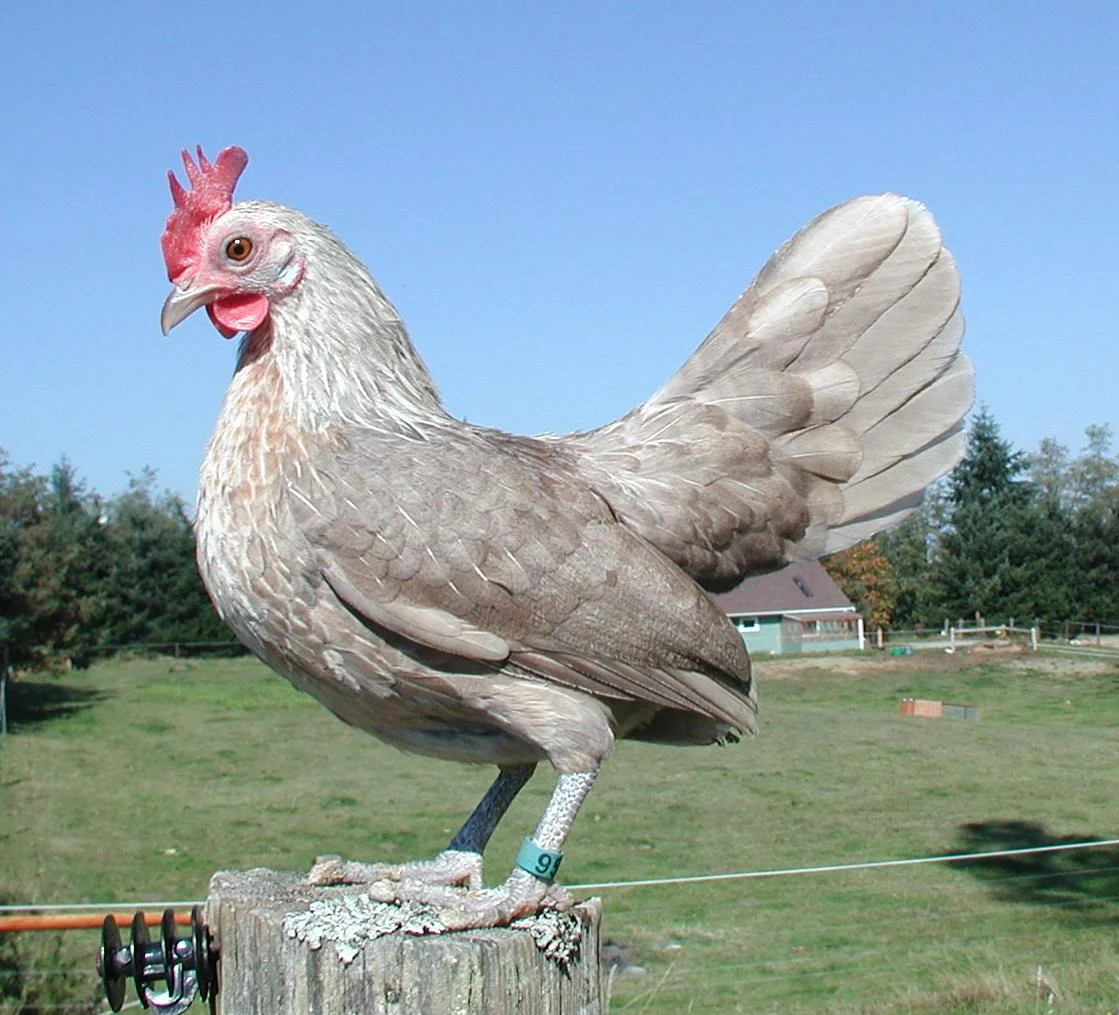 Chicken anatomy
Know your chicken’s parts
Comb, wing, tail, hock and shank: a tour of the parts keepers talk about.
View photo reference
What you’re seeing
Use the labeled side view to connect everyday chicken terms to a real bird. Plumage, body shape and comb size vary between breeds.
What to check
Start with the whole bird, then compare both sides. Use the same part names when describing a change or asking the flock for help.
Compare carefully
The feathered upper leg is different from the exposed, scaled shank below the hock.
Public domain. Resized; labels added separately for reference.
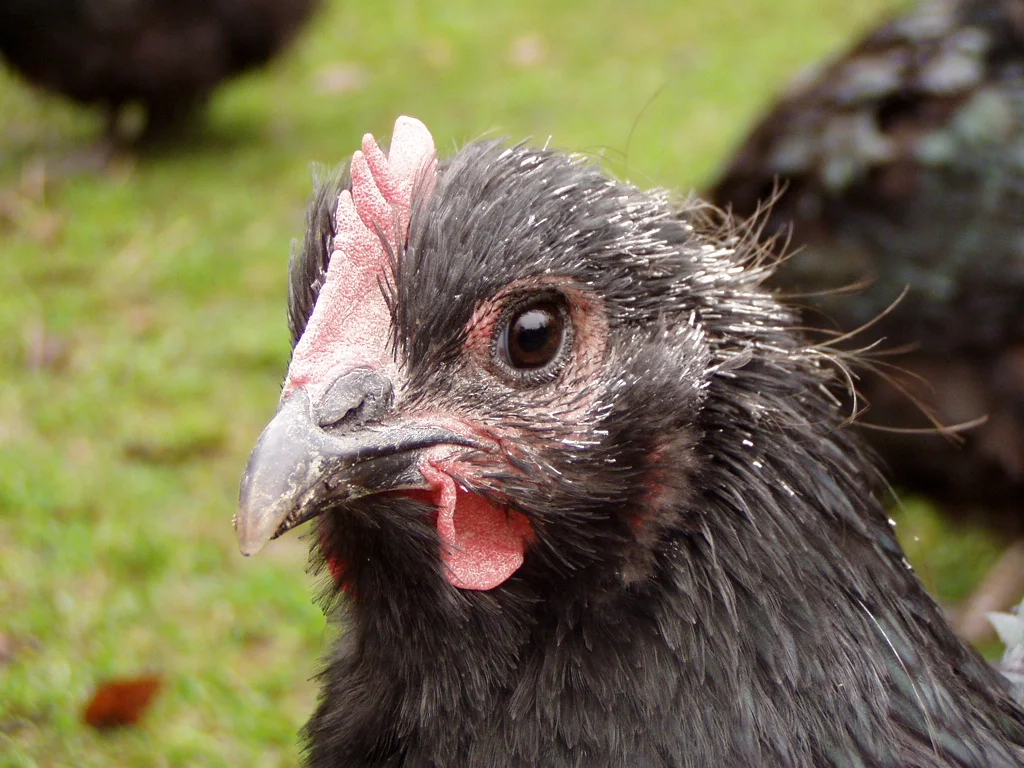
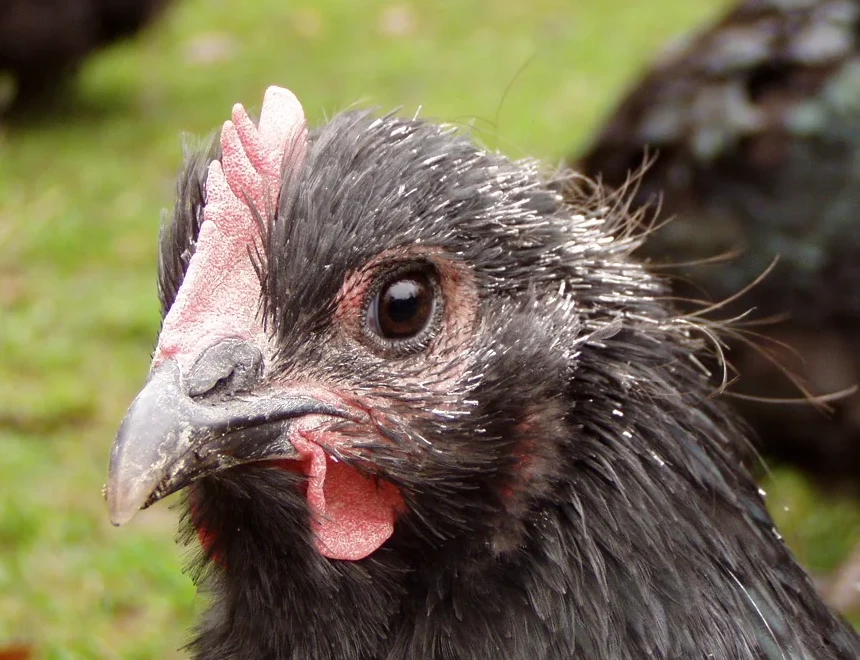 Chicken anatomy
Comb, wattles & beak
The comb is on top; wattles hang beneath the beak.
View photo reference
What you’re seeing
The pink comb sits on top of the head. The red wattles hang below the beak. This real close-up also shows developing head feathers during a molt.
What to check
Compare with the same bird’s usual appearance. Breed, sex and laying stage affect comb size and appearance.
Compare carefully
Small feathers growing around the face are separate from the fleshy comb and wattles.
Compare: Know your chicken’s parts →CC BY-SA 3.0. Cropped and resized; labels added separately for reference. Photo adaptations retain this same license.
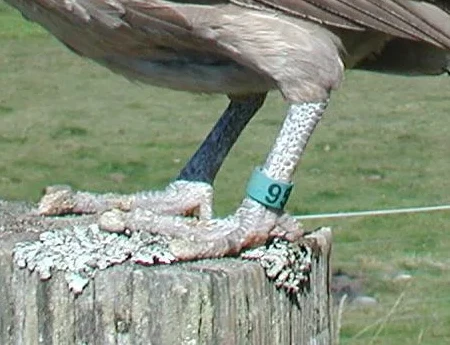 Chicken anatomy
Hocks, shanks & toes
Locate the hock above the scaled shank, and the toes below.
View photo reference
What you’re seeing
The exposed shank is the scaled lower leg. The bend above it is the hock. Toes end in claws; the identification band in this photo is not part of the leg.
What to check
Compare both legs and look for changes in scales, swelling or how the bird bears weight.
Compare carefully
Some breeds have feathered legs or an extra toe. Compare with a bird of the same breed.
Compare: Know your chicken’s parts →Public domain. Cropped and resized; labels added separately for reference.
 Chicken anatomy
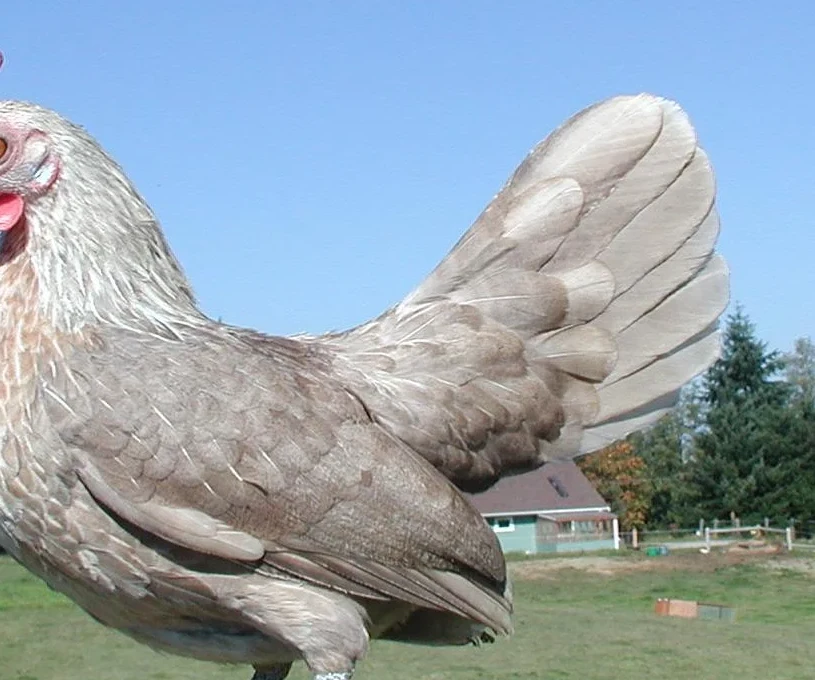
Wings & tail feathers
A folded wing rests against the body; the tail rises behind it.
View photo reference
What you’re seeing
The folded wing lies along the side of the bird. The tail projects behind the body. This photograph shows adult contour and flight feathers.
What to check
Notice which part has missing or damaged feathers. Naming the location helps distinguish a wing issue from tail or body feather loss.
Compare carefully
Adult rooster saddle and sickle feathers can look quite different from a hen’s plumage.
Compare: Know your chicken’s parts →Public domain. Cropped and resized; labels added separately for reference.
 Egg abnormalities
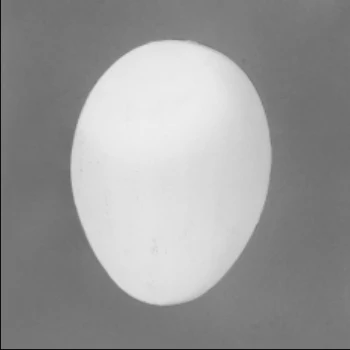
A usual egg shape
A smooth oval is a useful starting point for comparison.
View photo reference
What you’re seeing
The photographed egg has a typical oval outline with a larger, rounded end and a narrower end. Natural shell color is not an abnormality.
What to check
Compare unusual eggs with the eggs that hen normally lays. A normal-looking shell does not establish food safety.
Compare carefully
An egg with pronounced ridges or thin areas can differ from a harmless change in size or color.
Compare: Pronounced shell ridges →Public domain · US government work. Figure 32, cropped from the original publication; labels added separately for reference.
 Egg abnormalities
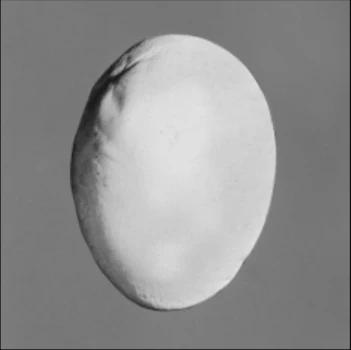
Pronounced shell ridges
Raised ridges and an uneven outline are visible shell changes.
View photo reference
What you’re seeing
This USDA example has pronounced ridges and/or thin areas. The photograph identifies the shell change, not the underlying cause.
What to check
Record how often it happens and whether other hens are affected. Review feed, stress and flock health if the change repeats.
Compare carefully
A few slight rough areas are different from pronounced ridges. Compare both reference photographs.
Compare: A usual egg shape →Public domain · US government work. Figure 35, cropped from the original publication; labels added separately for reference.
 Egg abnormalities
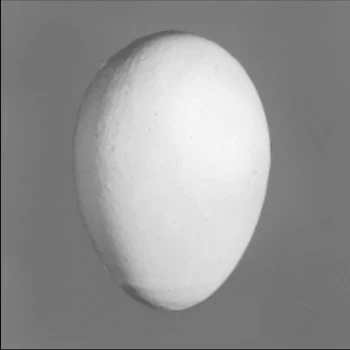
Slight shell roughness
A comparison for subtle shell texture versus more pronounced defects.
View photo reference
What you’re seeing
The USDA example shows slight ridges and rough areas that do not materially affect shape and strength in that grading example.
What to check
Feel and inspect the shell gently. Note whether the texture is new for that hen, and look for thin spots or cracks.
Compare carefully
This reference is a texture comparison, not a diagnosis of calcium excess or deficiency.
Compare: Pronounced shell ridges →Public domain · US government work. Figure 34, cropped from the original publication; labels added separately for reference.
 Egg abnormalities
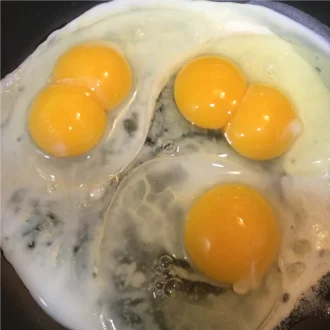
Two yolks in one egg
A real comparison showing two yolks inside each of two eggs.
View photo reference
What you’re seeing
The source photographs three hen eggs in a frying pan. The two eggs at the top each have two yolks; the lower egg has one.
What to check
Note the hen’s age and whether it happens occasionally or repeatedly. Double yolks can occur when two yolks are released close together.
Compare carefully
A double yolk is different from a blood spot or a developing embryo.
CC BY-SA 4.0. Resized; labels added separately for reference. Photo adaptations retain this same license.
 Egg abnormalities
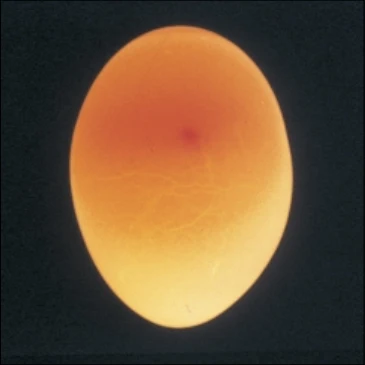
A small blood spot
A small red spot is different from an embryo or a blood ring.
View photo reference
What you’re seeing
This candled egg shows a small blood spot. Blood can enter an egg during formation; a spot by itself is not a developing chick.
What to check
Check the opened egg as well as the shell. Keep ordinary egg-handling and cooking precautions; discard eggs with diffuse bloody whites.
Compare carefully
A small localized spot is different from blood spread through the white.
Compare: Blood spread through the white →Read more
Poultry Extension · Blood spot eggs ↗ (opens in a new tab)USDA FSIS · Shell eggs from farm to table ↗ (opens in a new tab)Public domain · US government work. Figure 43, cropped from the original publication; labels added separately for reference.
 Egg abnormalities
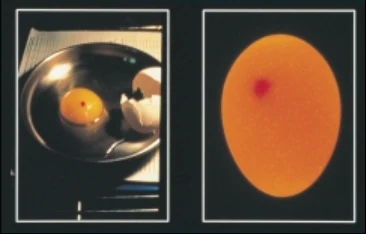
A larger blood spot
The same defect shown in an opened egg and through candling.
View photo reference
What you’re seeing
The paired USDA photographs show the broken-out appearance beside the candled appearance of a large blood spot.
What to check
Do not treat all blood-containing eggs as equivalent to a tiny spot. USDA grading treats large blood spots and bloody whites as loss eggs.
Compare carefully
The small-spot reference helps distinguish a localized speck from a larger area of blood.
Compare: A small blood spot →Read more
USDA Agricultural Marketing Service · Egg-Grading Manual (PDF) ↗ (opens in a new tab)USDA FSIS · Shell eggs from farm to table ↗ (opens in a new tab)Public domain · US government work. Figure 44, cropped from the original publication; labels added separately for reference.
 Egg abnormalities
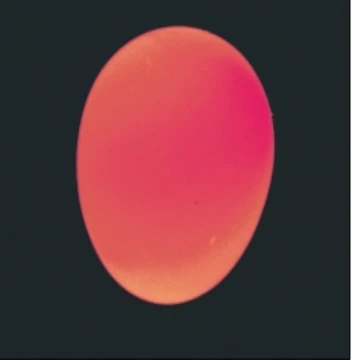
Blood spread through the white
A widespread red appearance differs from one small spot.
View photo reference
What you’re seeing
This candled example illustrates blood diffused through the egg white, rather than a small, localized blood spot.
What to check
Discard an egg with bloody whites. If egg changes are recurring, record the pattern and seek advice about the hen’s health.
Compare carefully
Lighting changes how a candled egg looks. The title identifies the confirmed USDA example; color alone is not a test.
Compare: A small blood spot →Read more
USDA Agricultural Marketing Service · Egg-Grading Manual (PDF) ↗ (opens in a new tab)USDA FSIS · Shell eggs from farm to table ↗ (opens in a new tab)Public domain · US government work. Figure 45, cropped from the original publication; labels added separately for reference.
Molting & feathersPin feathers during molt
Short, wrapped feather shafts can give a molting hen a prickly look.
View photo reference
What you’re seeing
The pale, pointed shafts around this hen’s head are developing feathers still surrounded by their sheaths. The photographer identifies the bird as an Orpington hen in molt.
What to check
Look for regrowth along with feather shedding. Note appetite, behavior and any skin injury; a feather-loss photo alone cannot settle the cause.
Compare carefully
Pin-feather sheaths and lice eggs are different structures. Compare the feather-base egg clusters in the parasite collection.
Compare: Lice eggs at feather bases →CC BY-SA 3.0. Resized; labels added separately for reference. Photo adaptations retain this same license.
 Molting & feathers
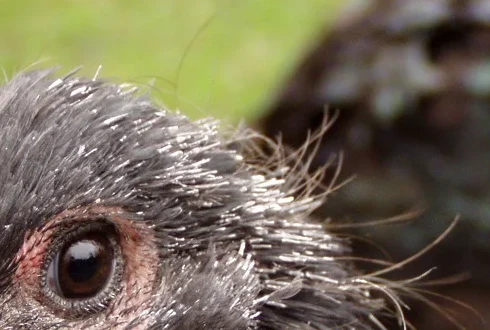
A closer look at feather sheaths
A close-up makes the pale sleeves around new feathers easier to see.
View photo reference
What you’re seeing
This is a closer crop of the same molting hen, not a later stage in a before-and-after sequence. Small sheaths surround the growing feathers.
What to check
Observe gently. Avoid pulling at developing feathers. Use the original photograph to see where the close-up sits on the bird.
Compare carefully
Lice eggs attach to existing feather shafts; these photographed sheaths surround developing feathers.
Compare: Pin feathers during molt →CC BY-SA 3.0. Cropped and resized; labels added separately for reference. Photo adaptations retain this same license.
Molting & feathersMature feathers for comparison
Broad, opened feathers provide a contrast with narrow pin feathers.
View photo reference
What you’re seeing
The mature wing and tail feathers have opened surfaces rather than the narrow, sheathed appearance of new pin feathers.
What to check
Compare structure as well as how much skin is visible. Breed-specific feathering can look very different.
Compare carefully
This is a different bird used for comparison, not the molting hen after regrowth.
Compare: Pin feathers during molt →Public domain. Cropped and resized; labels added separately for reference.
 Common parasites
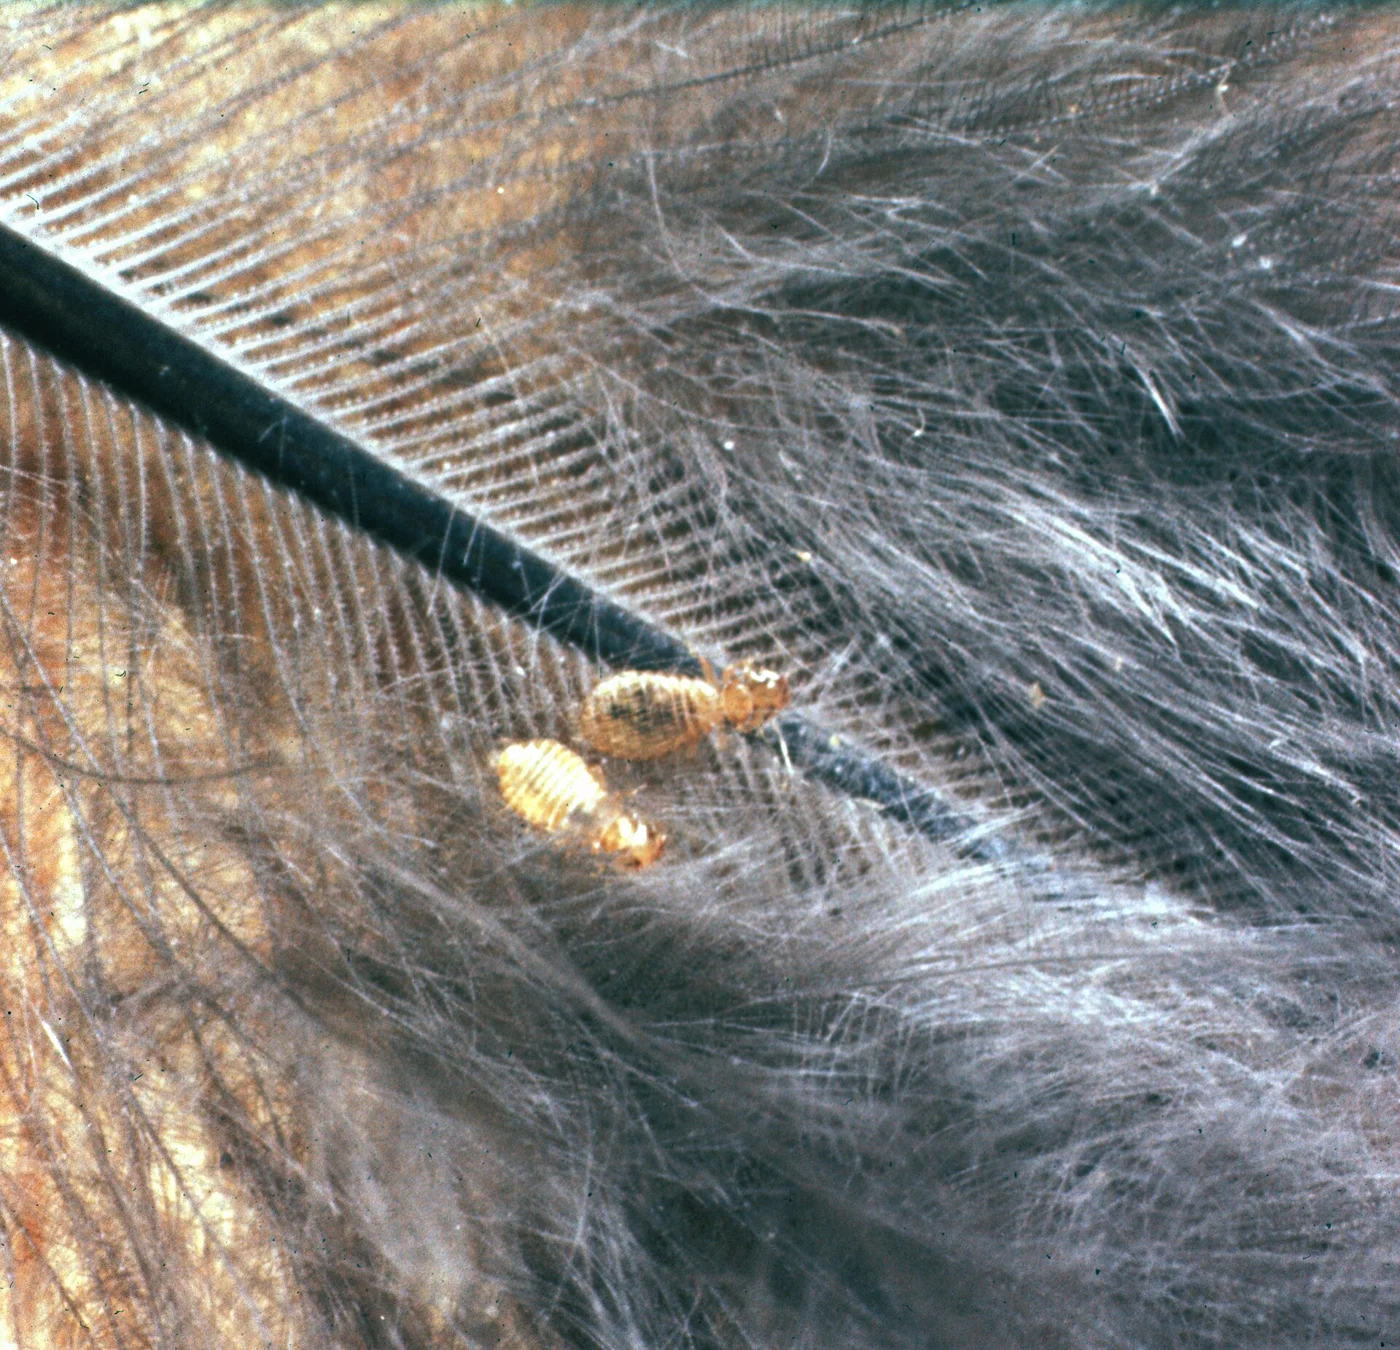
Chicken body lice
A real magnified view of young lice against chicken feather material.
View photo reference
What you’re seeing
The source identifies these insects as Menacanthus stramineus nymphs: young chicken body lice photographed on a chicken feather.
What to check
Part feathers gently and inspect the skin and feather bases, including around the vent and under wings. Moving insects and egg clusters are useful details to photograph.
Compare carefully
Mites are different parasites. Magnification changes apparent size; this photograph is not shown at life size.
Compare: Lice eggs at feather bases →CC BY 3.0 us. Resized; labels added separately for reference.
 Common parasites
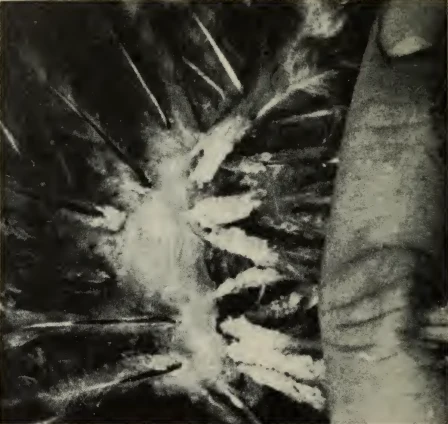
Lice eggs at feather bases
Clusters attached to feather shafts provide a useful identification clue.
View photo reference
What you’re seeing
The original caption identifies chicken body louse egg masses attached to feathers near the vent. This is an archival photograph, with lower detail than a modern macro image.
What to check
Look for clusters fixed to the shafts, and inspect for moving lice nearby. A sharp close-up and a wider location photo are useful when asking for help.
Compare carefully
Compare with the pale sheaths surrounding new pin feathers. Loose flakes by themselves are not the same as a confirmed egg cluster.
Compare: Pin feathers during molt →Public domain · expired Canadian Crown copyright. Figure 1, cropped from an archival publication; labels added separately for reference.
 Common parasites
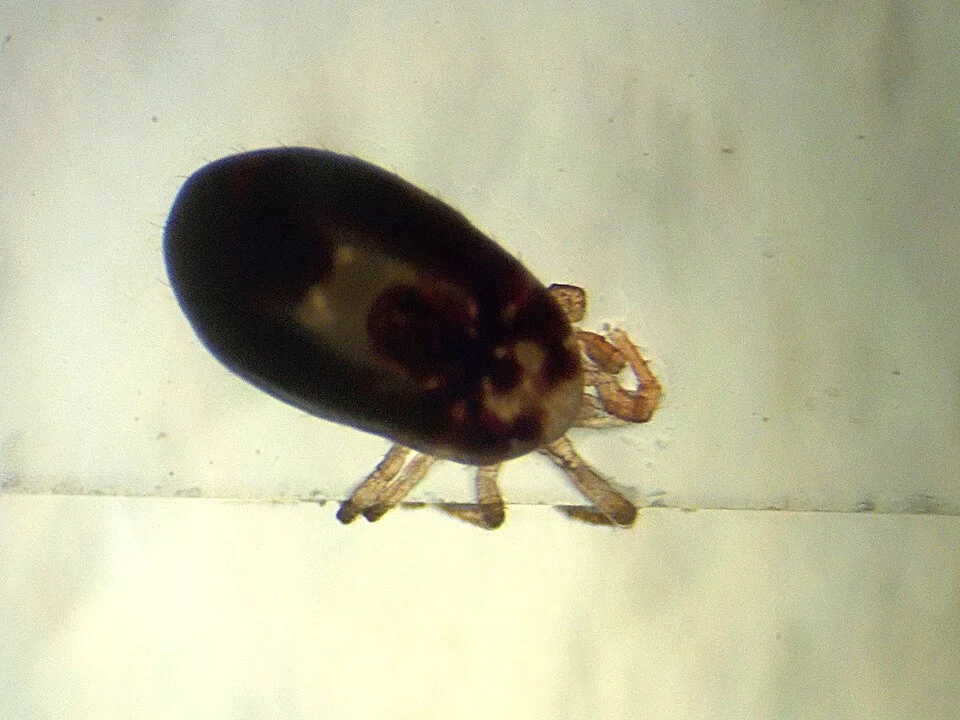
Red poultry mite
A microscopic specimen paired with where to inspect the coop.
View photo reference
What you’re seeing
The photographer identifies this specimen from a hen as Dermanyssus gallinae. Its microscopic appearance is not the size or color you will necessarily see unaided.
What to check
Check roost ends, cracks and hiding places in the coop, especially after dark. Red poultry mites spend much of their time off the bird.
Compare carefully
Northern fowl mites are another common poultry mite and are more often found living on the bird.
Compare: Northern fowl mite →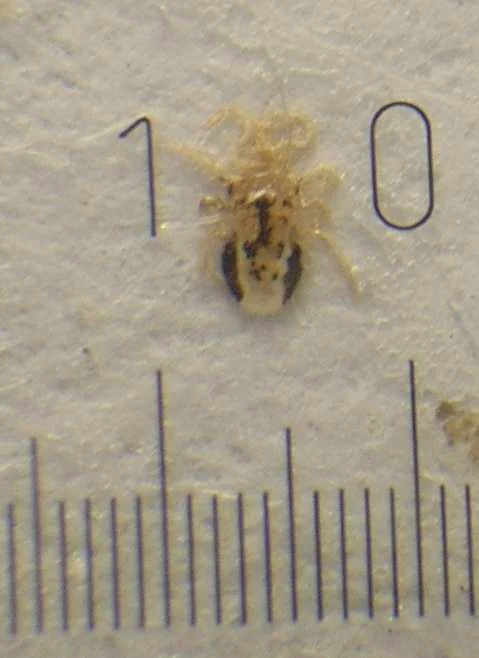 Common parasites
Northern fowl mite
A magnified reference specimen; inspect the bird as well as the coop.
View photo reference
What you’re seeing
The source labels this specimen Ornithonyssus sylviarum. It was collected from a rodent nest, not photographed on a chicken. Each small scale division is 0.1 mm.
What to check
For chickens, inspect feathers and skin around the vent for moving mites and soiled feather bases. Identification may need magnification or expert help.
Compare carefully
A magnified specimen is a shape reference. Dark debris around a vent alone does not confirm which mite is present.
Compare: Red poultry mite →Public domain. Resized; labels added separately for reference.
 Common parasites
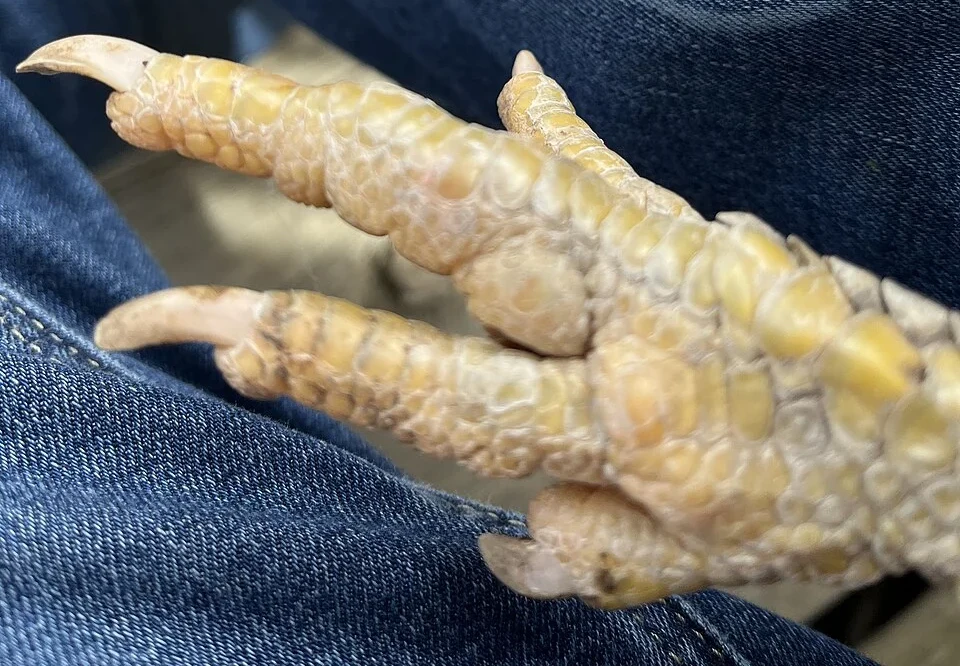
Raised, crusty leg scales
A close-up of thickened scales and crusting on a chicken’s foot.
View photo reference
What you’re seeing
The photographer labels this example as scaly leg. Thickened, lifted scales and crusting are changes associated with scaly-leg mite infestations.
What to check
Compare both feet with their normal appearance. Photograph the scales clearly and ask a veterinarian to assess persistent changes, pain or lameness.
Compare carefully
Normal leg scales vary with age and breed. A photograph does not confirm mites beneath the scales.
Compare: Hocks, shanks & toes →CC BY-SA 4.0. Cropped and resized; labels added separately for reference. Photo adaptations retain this same license.
 Predator evidence
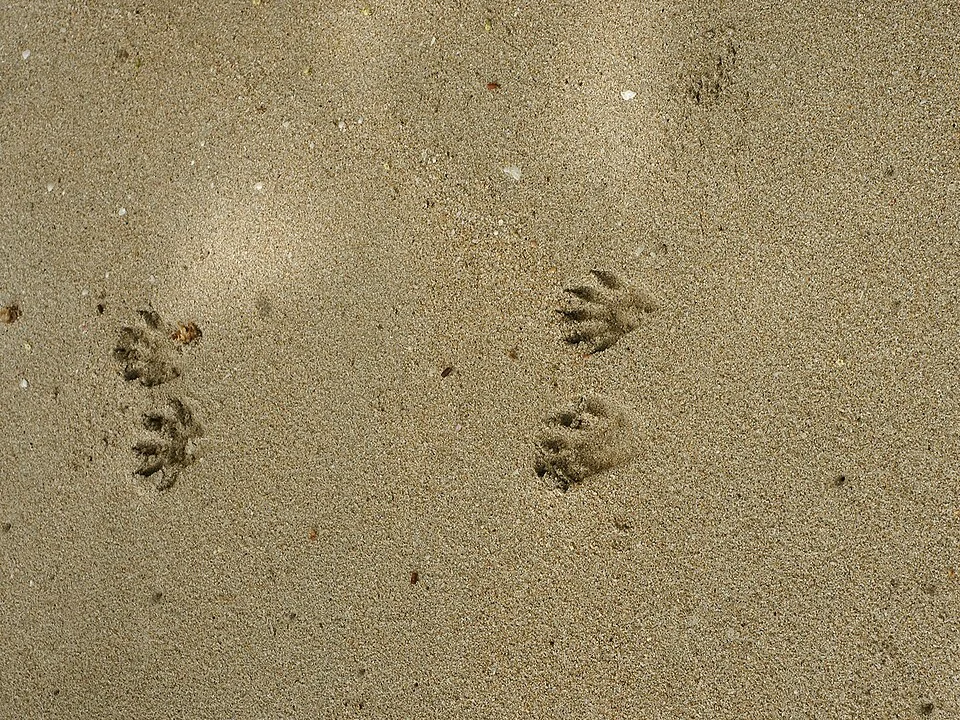
Raccoon tracks
Hand-like prints can be a clue to activity around the coop.
View photo reference
What you’re seeing
The photographer identifies these as common raccoon tracks. The elongated, hand-like toes are useful features to compare with evidence near a coop.
What to check
Photograph several prints before the surface changes. Include a ruler and a wider view of the route toward the coop.
Compare carefully
Tracks show animal activity; they do not establish that the animal caused a particular loss.
Compare: Photograph tracks with a scale →CC BY-SA 3.0. Resized; labels added separately for reference. Photo adaptations retain this same license.
 Predator evidence
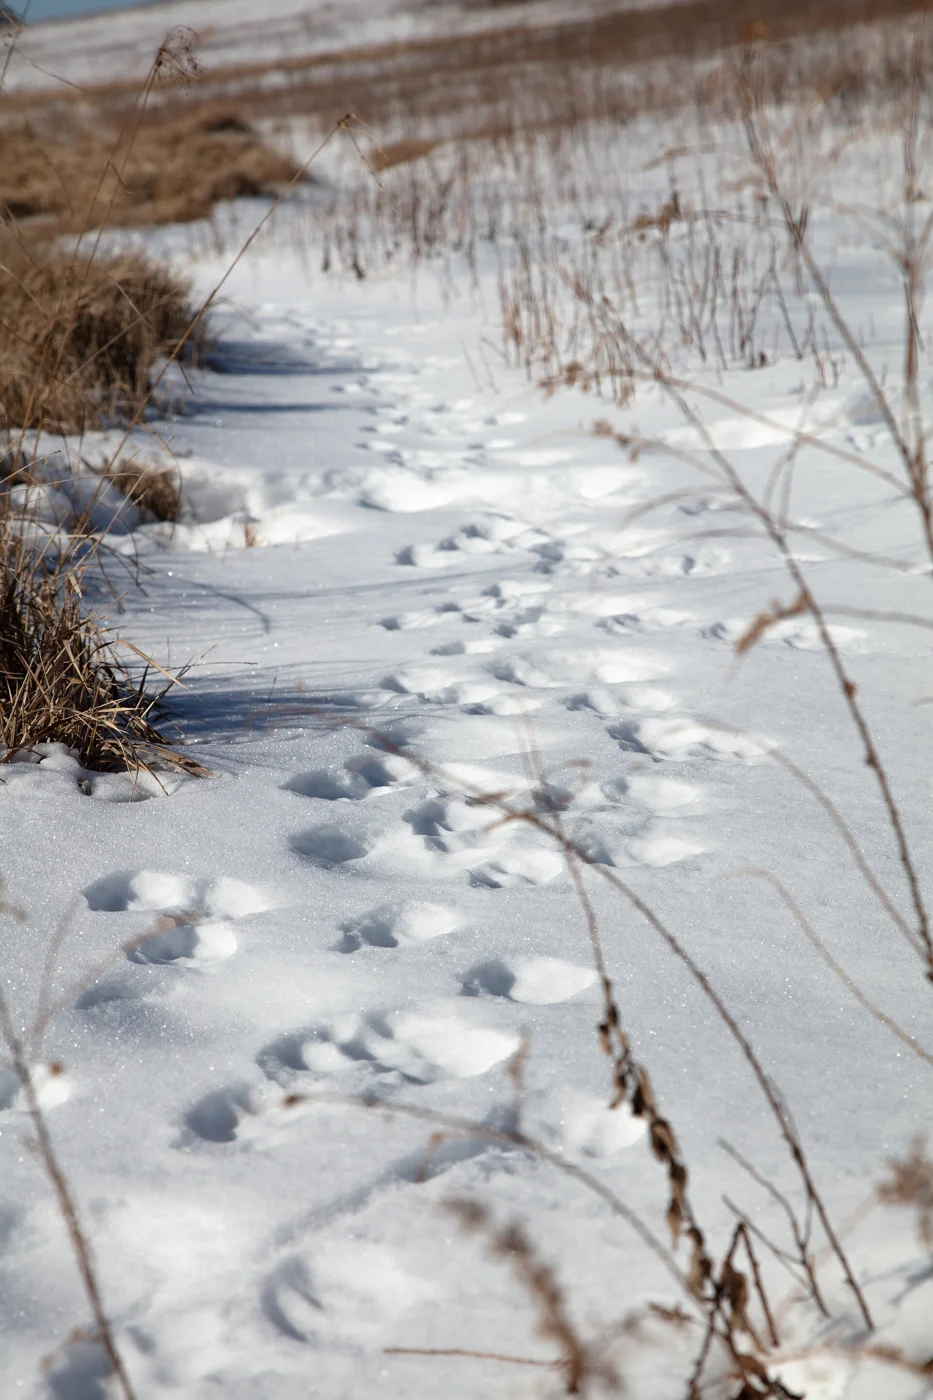
A fox’s track trail
The wider trail can tell you more than an isolated print.
View photo reference
What you’re seeing
The National Park Service caption identifies a fox track trail at Big Meadows. This image shows the path across snow rather than a detailed close-up of one paw.
What to check
Record the route, entry points, time of activity and close-up prints. Check whether there are other signs at the coop.
Compare carefully
Several animals can leave similar trails. Combine tracks with other evidence rather than naming an attacker from this pattern alone.
Compare: Raccoon tracks →Public domain. Resized; labels added separately for reference.
 Predator evidence
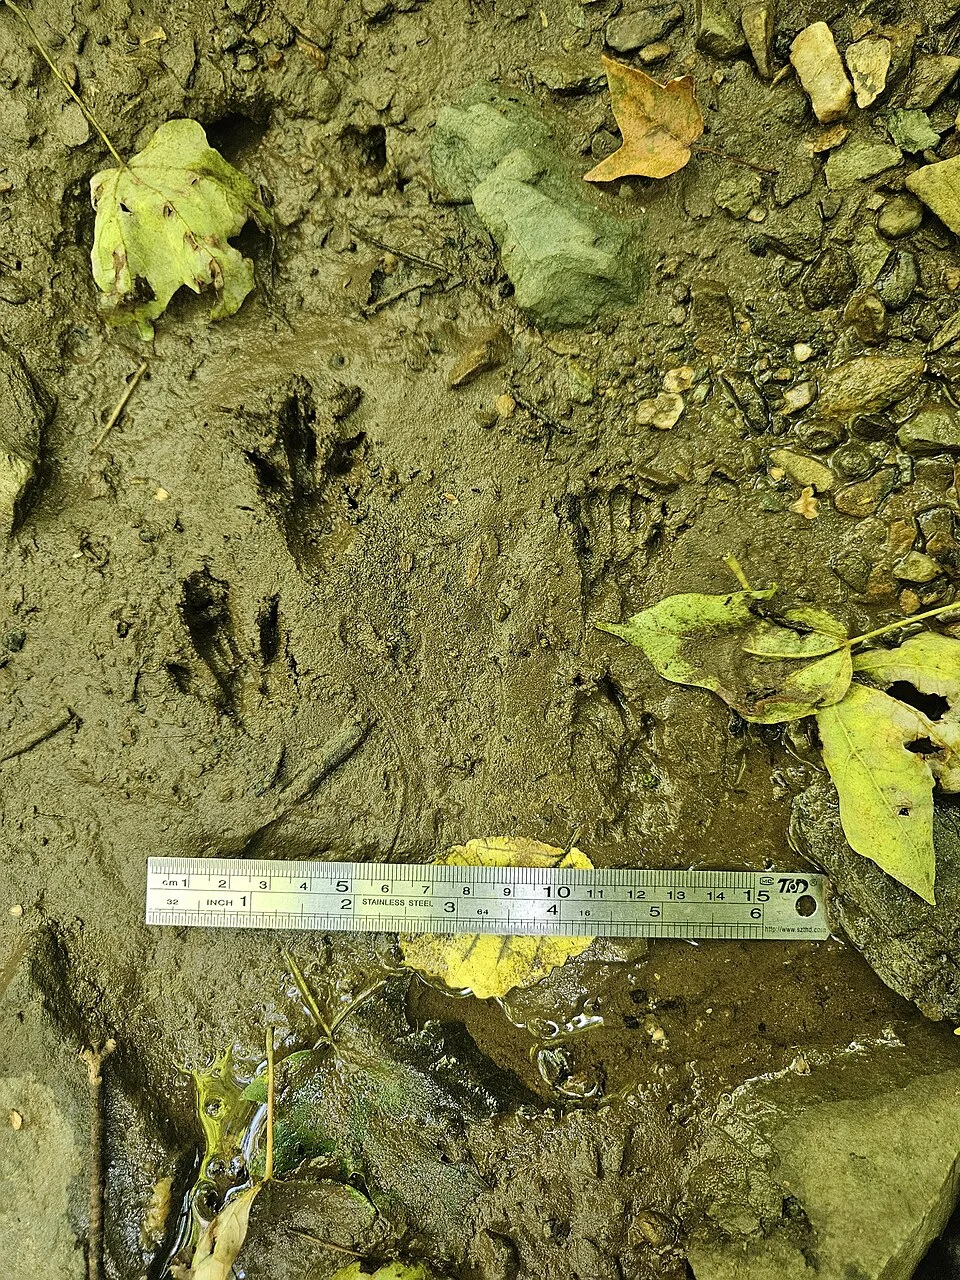
Photograph tracks with a scale
A ruler preserves the size information a photo otherwise loses.
View photo reference
What you’re seeing
This documented raccoon-track photograph includes a scale. It illustrates a useful way to record evidence before comparing it with a reference.
What to check
Keep the ruler beside the print and take the photograph from above. Add a second image of the surrounding area.
Compare carefully
A close-up without scale can make small and large animals’ prints hard to distinguish.
Compare: Raccoon tracks →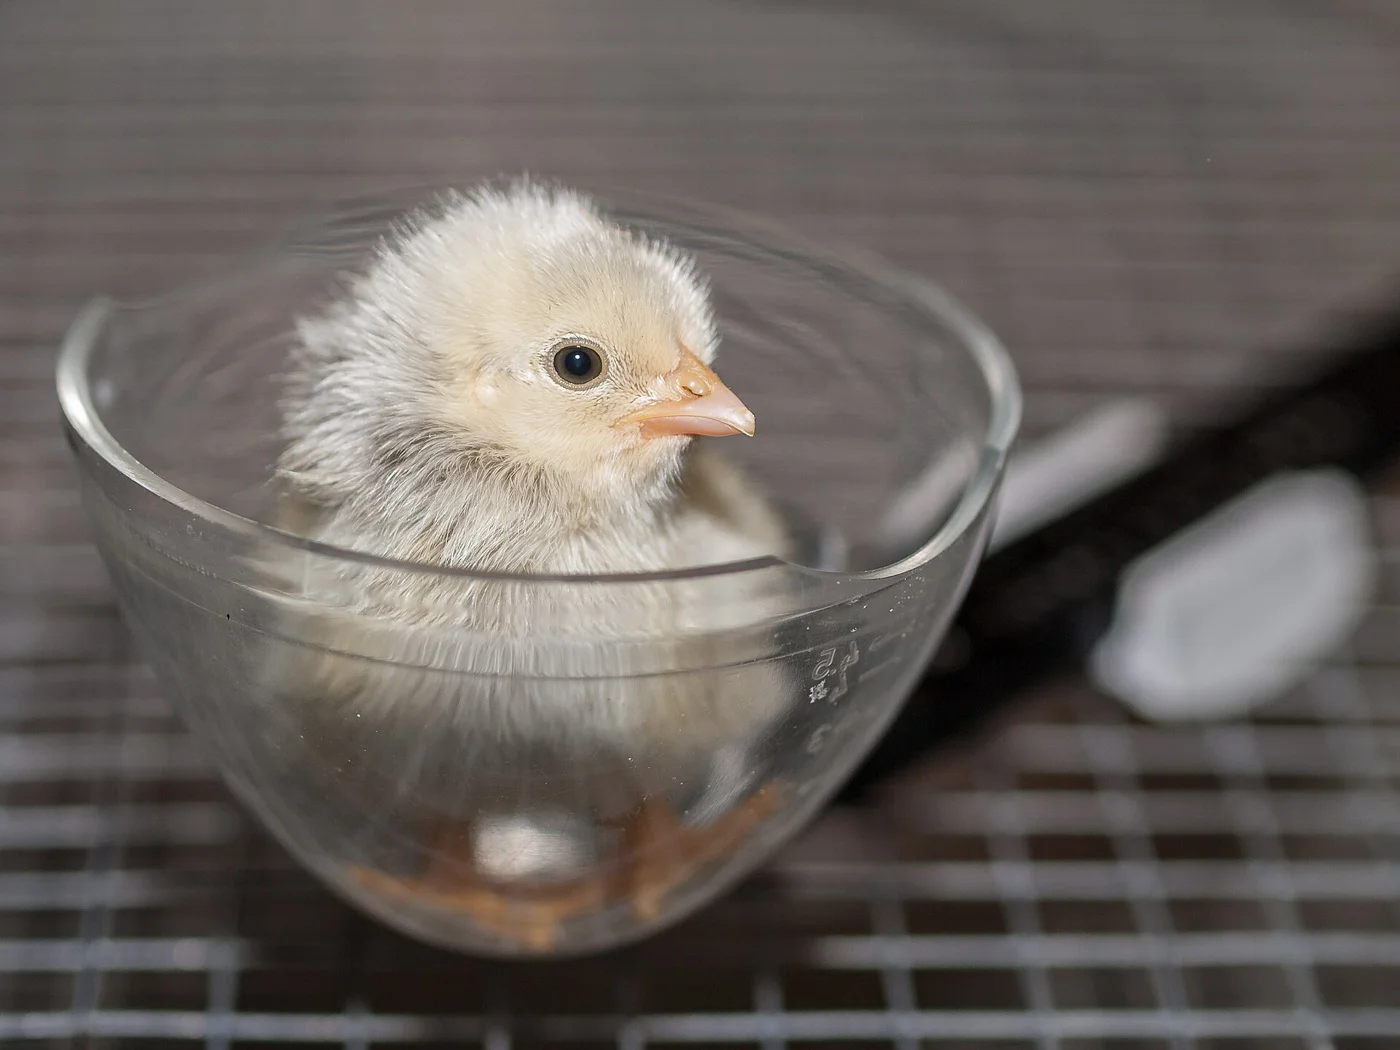 Chick development
Day one: covered in down
A documented day-old chick, with its soft down still prominent.
View photo reference
What you’re seeing
The photographer records this hatchling as one day old. It is sitting on a weighing scale; the measured weight belongs to this individual chick.
What to check
Use documented age and breed when comparing your chick. Watch its ability to stand, eat, drink and stay comfortable.
Compare carefully
This is not a universal day-one weight target. Different breeds and individuals develop at different rates.
Compare: Nine days: early feathering →CC BY-SA 3.0. Resized; labels added separately for reference. Photo adaptations retain this same license.
 Chick development
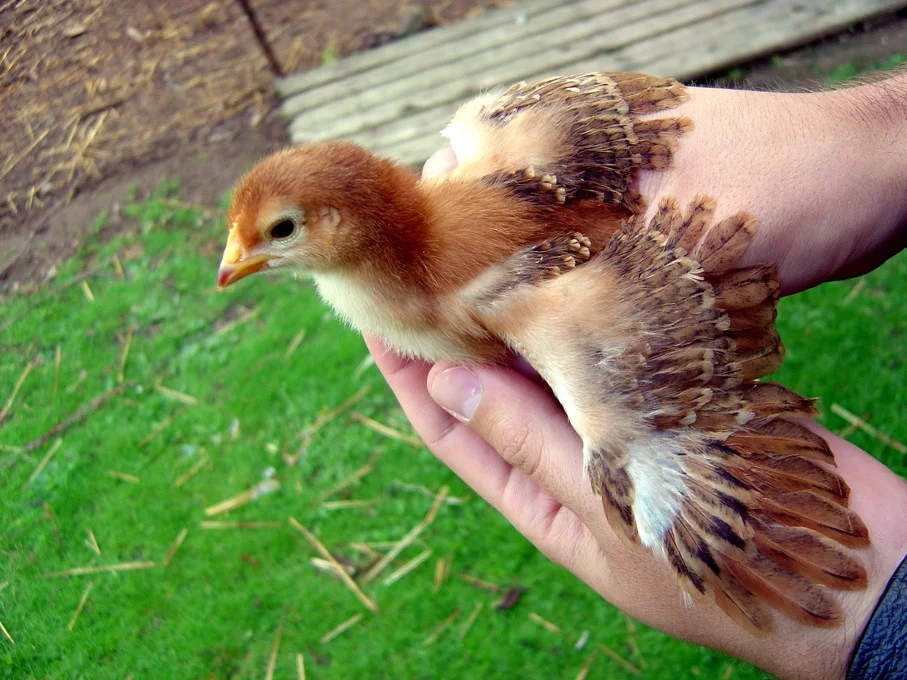
Nine days: early feathering
A named breed and known age make this a useful early growth example.
View photo reference
What you’re seeing
This source documents a nine-day-old Rhode Island Red chick. Compare the developing wing feathers with the softer body down.
What to check
Look at feather coverage, not age alone. Note the chick’s breed and take weekly photographs from the same angle.
Compare carefully
Do not use this one bird to infer the exact age, sex or readiness for outdoor temperatures of another chick.
Compare: A chick’s first wing feathers →CC BY-SA 2.0. Resized; labels added separately for reference. Photo adaptations retain this same license.
 Chick development
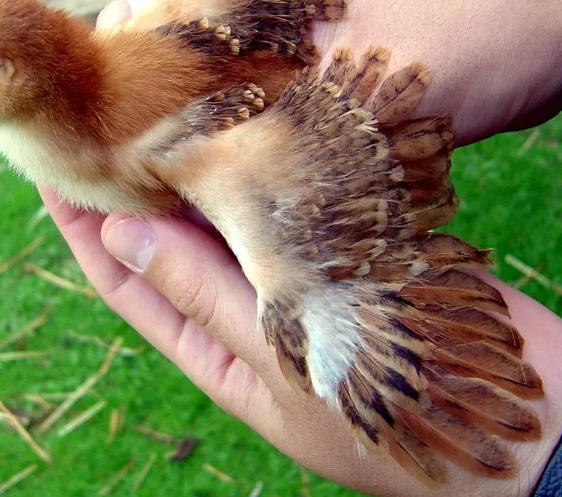
A chick’s first wing feathers
A close-up separates early wing feathers from the surrounding down.
View photo reference
What you’re seeing
This crop comes from the nine-day-old chick photograph. Early wing feather growth is easier to compare when the wing area fills the frame.
What to check
Compare the visible wing feathering with the body and head. A small patch of wing feathers does not mean the entire chick is fully feathered.
Compare carefully
The accompanying whole-chick photograph shows how much down remains elsewhere.
Compare: Nine days: early feathering →CC BY-SA 2.0. Cropped and resized; labels added separately for reference. Photo adaptations retain this same license.
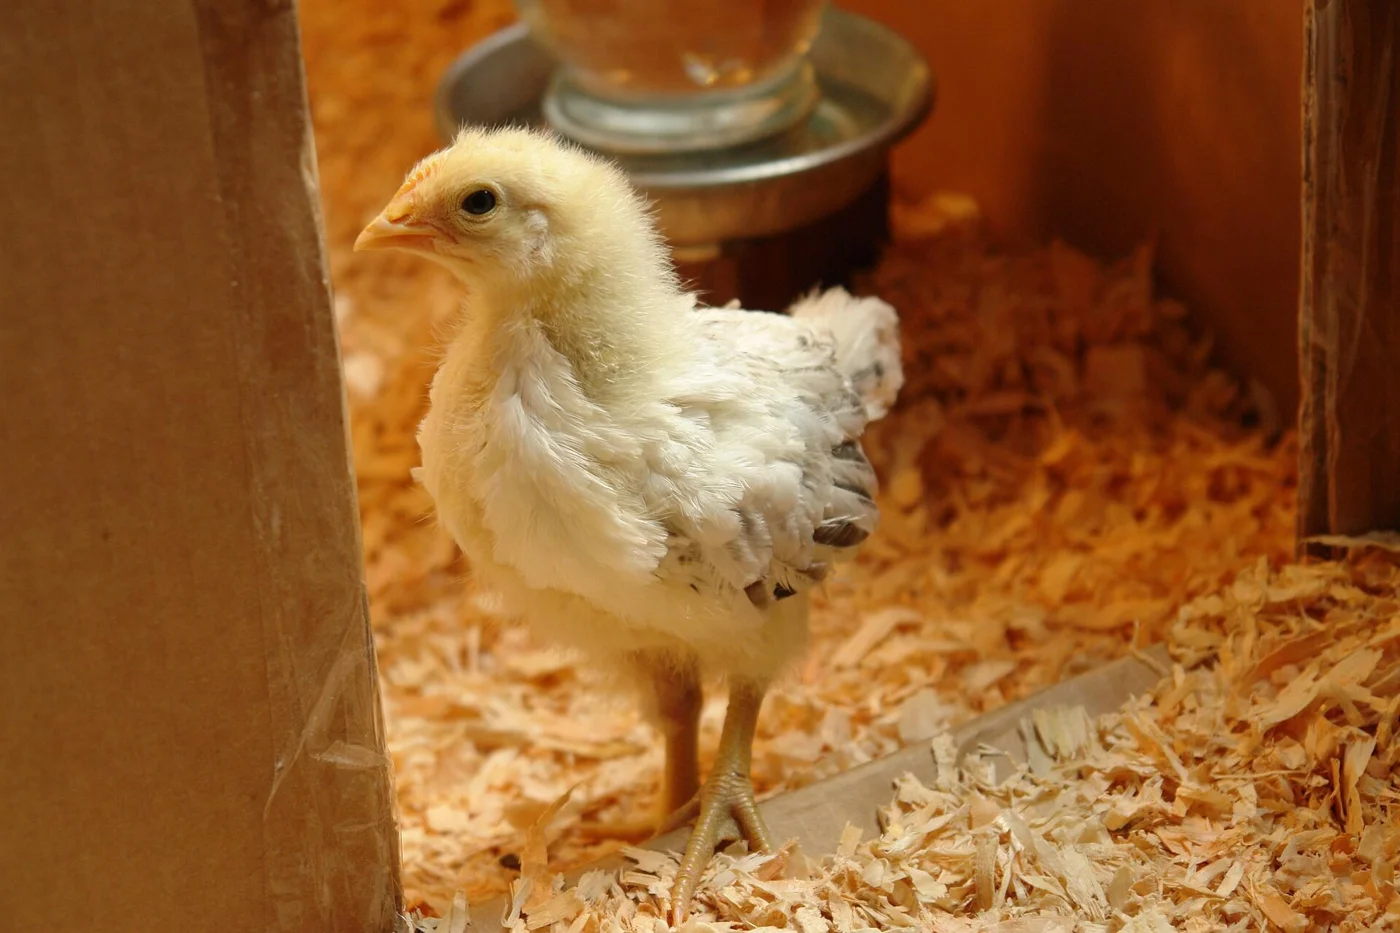 Chick development
Three weeks: growing juvenile
A real three-week-old Delaware, with a different stage of feathering.
View photo reference
What you’re seeing
The source identifies this bird as a Delaware chick at three weeks. Its appearance is a breed-specific example, not a deadline every chick must meet.
What to check
Record body feathering, appetite, growth and behavior. Use the chick-to-coop planner alongside the photographic comparison.
Compare carefully
These age examples show different birds and breeds; they are not a same-bird growth sequence.
Compare: Nine days: early feathering →CC BY-SA 2.0. Resized; labels added separately for reference. Photo adaptations retain this same license.
Nothing hatched from that search.
Try a broader word like “feathers” or “eggs,” or browse all the references.

Organize the signs you’re noticing with the symptom checker.
Open symptom checker →
Turn the photo comparisons into a plan for the next stage.
Open chick-to-coop planner →About these photos, labels and sources
Identification photographs come from documented sources, with individual credits and reuse terms in each reference. Several photographs are cropped from the same original to show different details. Comparison photographs may show different birds; they are not a before-and-after sequence unless explicitly stated.
Microscopic, candled and archival images are labeled as such. Only documented chick ages and breeds are used. Labels and framing help you locate visible features; photographs do not establish every cause of an egg change, feather loss or predator event.
The collection uses existing Chicken Keepers artwork for decorative links. Identification photos are genuine source photographs. Image adaptations retain their stated licenses. Sources checked October 8, 2026.